http://www.dorkbotpdx.org/files/cultinductionrev2.jpg
more information at http://dorkbotpdx.org/workshop/arduino/cult_induction_rev2
RSVP to DDelmarDavis at gmail.
http://www.dorkbotpdx.org/files/cultinductionrev2.jpg
more information at http://dorkbotpdx.org/workshop/arduino/cult_induction_rev2
RSVP to DDelmarDavis at gmail.
I am old. I won’t say how old exactly but I am half way through a few experiments. Life, work.
It makes me very happy that three of these experiments will be funded as Tempus Dictum Projects.
I would like to thank Tempus Dictum for the opportunity to work on these items.
I am a very lucky man.
I am old. I won’t say how old exactly but I am half way through a few experiments.
Three of these experiments will be funded as Tempus Dictum Products.
I would like to thank Tempus Dictum for the opportunity to work on these items. I am a very lucky man.
I like wordpress.
It allows me to do much of what I post on the web without having to look at the underlying html and still letting me at the html. In fact I use WordPress to to post on Dorkbots Drupal pages. It is easier than hand rolling html and the new wordpress saves your drafts. This is no small issue: As I was reminded at 2:30 monday morning as Drupal timed out the session that I was writing on and ate my post. Between that and the Eagle files I was working with I lost most of sunday nights sleep. The other issue is portability. So last night I ran up mysql, unpacked the latest wordpress into my home directory and reconfigured the apache daemon that comes with leopard.
I plan to get more done and loose less sleep.
This has been reposted on dorkbotpdx.org 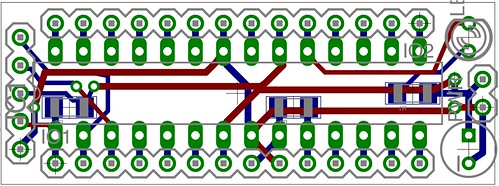
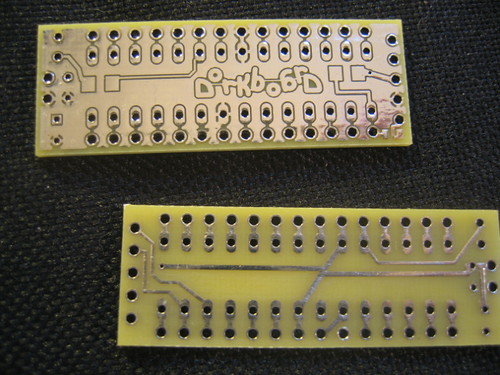
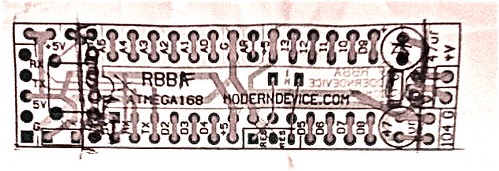
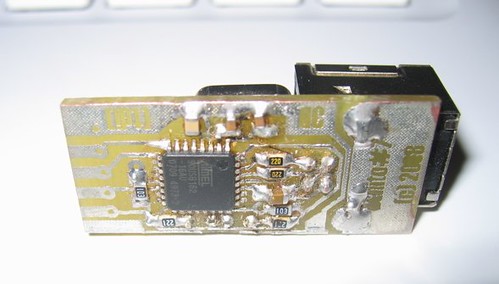
A few weeks ago I bought the last of the Really Bare Bones Arduino rev A boards from Brian at Wulfden (http://wulfden.org/freeduino/freeduino.shtml) I now have enough boards for one more workshop and then we have to reevaluate the boards which are avaliable. Pictured below is a finished board from the first “Arduino Cult Induction Workshop”
In addition to letting me clean out his new old stock Brian threw in one of the “Rev B” boards so I could check it out. Unfortunately I don’t like it.

The new board is almost 3/4″ of an inch longer than the original. Most of the new space is dedicated to room for a power jack and a regulator. Things that I never use. The design is supposed to allow you to cut the power jack off as well as the regulator. Notice in the finished board above that their is space for a big old reset switch. When the original Arduino came out you had to reset the board to get it into the bootloader. However in the past year or so all the new boards have been using the dtr signal run through a capacitor to pull the reset line so the switch is wasted space. The original board made up for this space by adding ample ground and supply connections. The new board adds another 1/8″ and gets rid of these.
As I was grumbling about this Mark Gross suggested that I just roll my own.
So we are back to the drawing board. Above is my pen markup of the changes that I wanted to see done to the original Really Bare Bones Arduino and below is the draft of the rework to scale with the RBBB rev B.
Now comes the fun part The cost of goods sold and a business case.

(this is part of an ongoing DorkbotPDX workshop series being sponsored by TempusDictum, Inc.)
A few weeks ago I bought the last of the Really Bare Bones Arduino rev A boards from Brian at Wulfden (http://wulfden.org/freeduino/freeduino.shtml) I now have enough boards for one more workshop and then we have to reevaluate the boards which are avaliable. Pictured below is a finished board from the first “Arduino Cult Induction Workshop”
In addition to letting me clean out his new old stock Brian threw in one of the “Rev B” boards so I could check it out. Unfortunately I don’t like it.
The new board is almost 3/4″ of an inch longer than the original. Most of the new space is dedicated to room for a power jack and a regulator. Things that I never use. The design is supposed to allow you to cut the power jack off as well as the regulator. Notice in the finished board above that their is space for a big old reset switch. When the original Arduino came out you had to reset the board to get it into the bootloader. However in the past year or so all the new boards have been using the dtr signal run through a capacitor to pull the reset line so the switch is wasted space. The original board made up for this space by adding ample ground and supply connections. The new board adds another 1/8″ and gets rid of these.
As I was grumbling about this Mark Gross suggested that I just roll my own.
So we are back to the drawing board. Above is my pen markup of the changes that I wanted to see done to the original Really Bare Bones Arduino and below is the draft of the rework to scale with the RBBB rev B.
Now comes the fun part (not) The cost of goods sold and a business case.
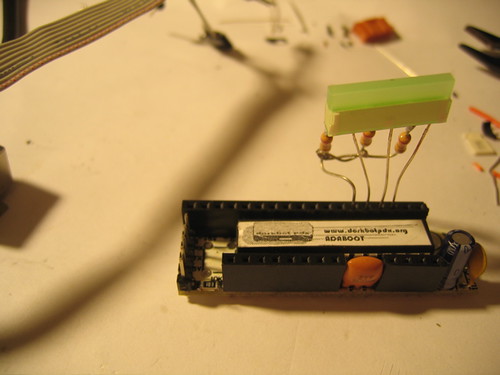
Note: This work is ongoing see the Benito info page for current info…

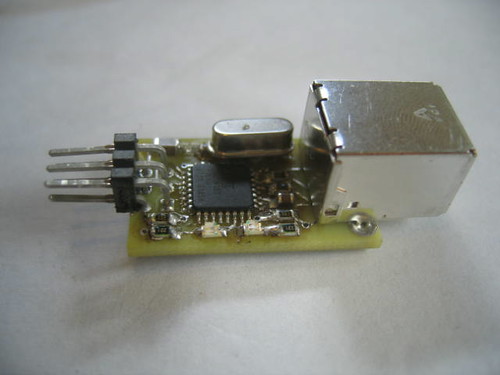
There were a few lessons that I learned at the Arduino Cult induction workshop that I put together this month. One of which was that I needed to simplify my programmer design on the cable end and not wait until I had a full blown product. Revisiting the original I first revised the ftdi boards to use a pinout compatible with the programming end of the RBBA (really bare bones arduino). Then I went back to the AT90USB162 based programmer modified the schematic to reduce the parts count.
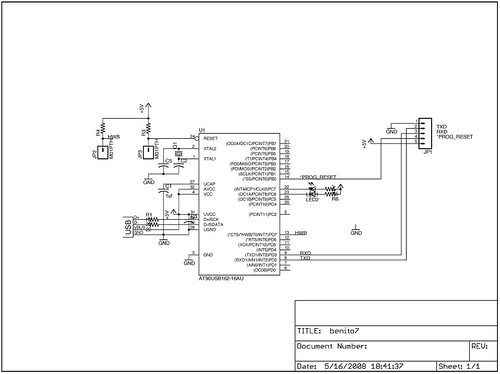
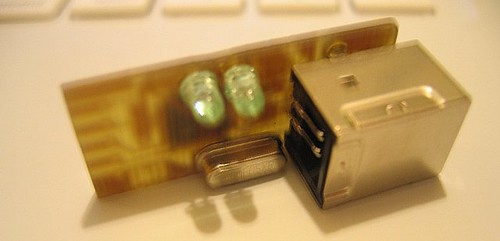
Then I made it fit into a similar profile.
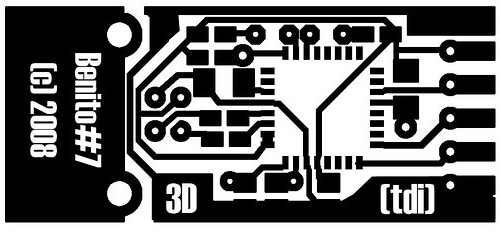
Link to positive image at 600 percent
Then I put together a parts manifest at q25 and found that in spite of the increased parts count it is actually cheaper than the ftdi boards.
Index  	Quantity  	Part Number  	Description  	Customer Reference  	Backorder Quantity  	Unit Price

USD 	Extended Price

USD

1 	50 	RHM10KARCT-ND 	RES 10K OHM 1/8W 5% 0805 SMD 	  	0 	0.02340 	$1.17

2 	25 	AT90USB162-16AURCT-ND 	IC AVR MCU 16K FLASH 32TQFP 	  	0 	3.15000 	$78.75

3 	25 	631-1099-ND 	CRYSTAL 8.0 MHZ SERIES 	  	0 	0.48900 	$12.23

4 	30 	PCC220CNCT-ND 	CAP 22PF 50V CERM CHIP 0805 SMD 	  	0 	0.06900 	$2.07

5 	200 	RHM220ACT-ND 	RES 220 OHM 1/8W 5% 0805 SMD 	  	0 	0.02340 	$4.68

6 	50 	RHM22ACT-ND 	RES 22 OHM 1/8W 5% 0805 SMD 	  	0 	0.04080 	$2.04

7 	100 	399-1168-1-ND 	CAP .10UF 25V CERAMIC X7R 0805 	  	0 	0.02670 	$2.67

8 	50 	399-1284-1-ND 	CAP 1.0UF 16V CERAMIC X7R 0805 	  	0 	0.09500 	$4.75

9 	30 	475-1401-ND 	LED 3MM 570NM GREEN DIFF RADIAL 	  	0 	0.05600 	$1.68

10 	1 	AT43301-SU-ND 	IC USB HUB CTRLR 4PORT 24SOIC 	  	0 	1.83000 	$1.83

11 	25 	609-1039-ND 	CONN RCPT USB TYPE B R/A PCB 	  	0 	0.54200 	$13.55

Subtotal	$125.42
The eagle files are attached below.
Firmware is also attached.
This requires Dean Camera’s MyUSB library (>1.4.1 along with a recent avr-gcc toolchain and dfu-programmer)
To build it; Create a directory in your MyUSB tree on the same level as the Demo directory named Projects.
Unpack the code into that directory, make and make program.

There were a few lessons that I learned at the Arduino Cult induction workshop that I put together this month. One of which was that I needed to simplify my programmer design on the cable end and not wait until I had a full blown product. Revisiting the original I first revised the ftdi boards to use a pinout compatible with the programming end of the rbba. Then I went back to the AT90USB162 based programmer modified the schematic to reduce the parts count.
Then I made it fit into a similar profile.
Then I put together a parts manifest at q25 and found that in spite of the increased parts count it is actually cheaper than the ftdi boards.
Index  	Quantity  	Part Number  	Description  	Customer Reference  	Backorder Quantity  	Unit Price

USD 	Extended Price

USD

1 	50 	RHM10KARCT-ND 	RES 10K OHM 1/8W 5% 0805 SMD 	  	0 	0.02340 	$1.17

2 	25 	AT90USB162-16AURCT-ND 	IC AVR MCU 16K FLASH 32TQFP 	  	0 	3.15000 	$78.75

3 	25 	631-1099-ND 	CRYSTAL 8.0 MHZ SERIES 	  	0 	0.48900 	$12.23

4 	30 	PCC220CNCT-ND 	CAP 22PF 50V CERM CHIP 0805 SMD 	  	0 	0.06900 	$2.07

5 	200 	RHM220ACT-ND 	RES 220 OHM 1/8W 5% 0805 SMD 	  	0 	0.02340 	$4.68

6 	50 	RHM22ACT-ND 	RES 22 OHM 1/8W 5% 0805 SMD 	  	0 	0.04080 	$2.04

7 	100 	399-1168-1-ND 	CAP .10UF 25V CERAMIC X7R 0805 	  	0 	0.02670 	$2.67

8 	50 	399-1284-1-ND 	CAP 1.0UF 16V CERAMIC X7R 0805 	  	0 	0.09500 	$4.75

9 	30 	475-1401-ND 	LED 3MM 570NM GREEN DIFF RADIAL 	  	0 	0.05600 	$1.68

10 	1 	AT43301-SU-ND 	IC USB HUB CTRLR 4PORT 24SOIC 	  	0 	1.83000 	$1.83

11 	25 	609-1039-ND 	CONN RCPT USB TYPE B R/A PCB 	  	0 	0.54200 	$13.55

Subtotal	$125.42
First of all I was really happy that so many people showed up and got as far into their construction as they did.
27 people and only one dead board.
I now know that getting all of that done in under 3 hours was a little ambitious. (The pacing was initially based on the photo session at http://www.flickr.com/photos/7175086@N05/sets/72157604783725339/ which took 20 minutes from start to finish)
For those of you who were unable to finish the cable Jacob Hedwig has provided a clear picture of a working cable at
http://www.flickr.com/photos/jacob_helwig/2485841122/in/set-72157605009944742

Pin 1 is on the bottom (Red wire in this picture) on both ends.
Pins -> USB
1 -> 2 (Rx)
2 -> 1 (Tx)
3 -> 7 (+5V)
4 -> 4 (Reset)
5 -> 3 (Ground)
The important thing is to count up from the side of the cable with the leds on it.
I am looking to have a second session for software as soon as I can get a room scheduled (this sunday or some sunday soon). In the mean time you can download the software (http://www.arduino.cc/en/Main/Software) and poke around at the main site (http://www.arduino.cc/). I will also be at the bi-weekly dorkbot meeting at the Lucky Lab NW tomorrow (May 12, 19th and Quimby) between 7 and 10 and will bring a soldering iron if anyone gets stuck or wants to finish up their board.
Feel free to email me as well.